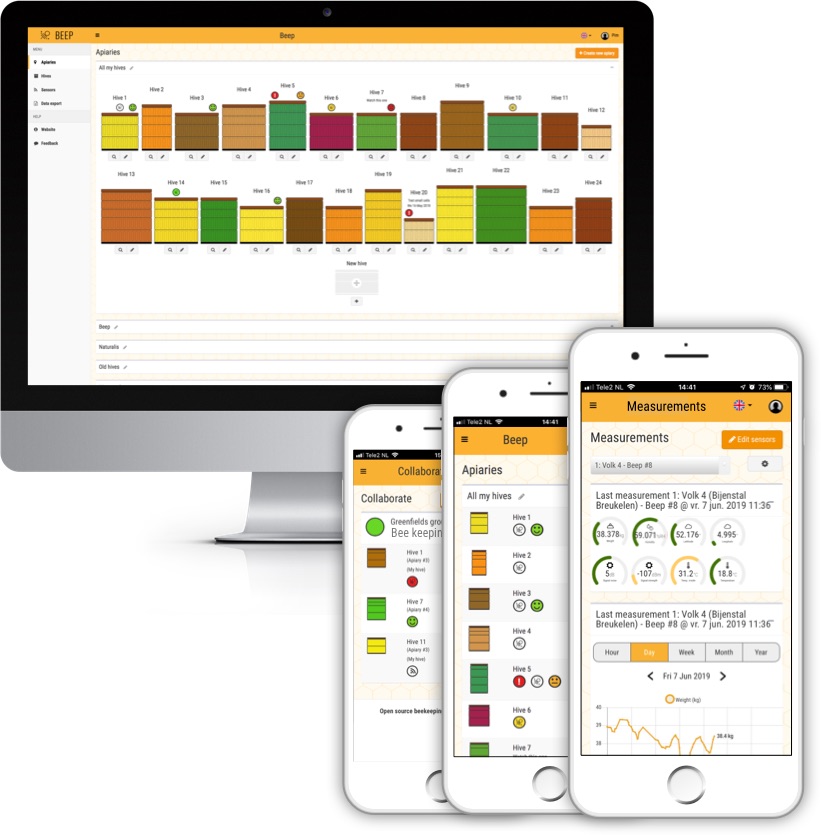
 La aplicación BEEP es un sistema en línea para apicultores. Puede reemplazar el mantenimiento de registros en papel. Debido a que es un sistema digital, permite nuevas posibilidades, como administrar y consultar los datos de las colonias de abejas desde cualquier ubicación y dispositivo. La aplicación web BEEP se puede utilizar de forma gratuita y está disponible, entre otros, en inglés, holandés, alemán, francés y rumano. Se puede acceder desde cualquier dispositivo con un navegador de Internet, como su teléfono móvil, tableta o computadora de escritorio.
Manual
En esta página encontrará una descripción general de las funciones de la aplicación BEEP y cómo puede utilizar estas funciones. En color rojo se indica qué funciones han sido agregadas o mejoradas en la versión 2.1.
- Iniciar sesión
- Elegir lenguaje
- Coloque (Colocar) la aplicación BEEP en su teléfono
- Crear un nuevo apiario
- Descripción general de apiarios y colmenas
- Crear o modificar la colmena
- Ingrese (ingresar) los detalles de la abeja reina
- Agregar una inspección * Improved
- Personaliza (Personalizar) tu lista de verificación de inspección
- Resumen de inspección
- Establecer recordatorios
- Cambiar o quitar apiarios, colmenas e inspecciones
- Mover o archivar colmena
- Colaborar* Nuevo * New
- Exportar datos
- Administrar cuenta
- Sensores
- Tus comentarios
- Informar de un error
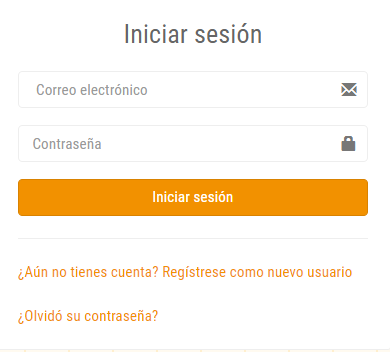
Iniciar sesión
Abra la aplicación en su computadora o teléfono móvil presionando el botón 'Abrir la aplicación' que figura arriba o haga clic aquí. BEEP es una aplicación web. Esto significa que Usted puede abrir la aplicación en su computadora, teléfono móvil, y tablet, y que no tiene que descargar nada. Además, la aplicación se actualiza automáticamente. Al final de esta página puede encontrar cómo puede instalar la aplicación BEEP en su teléfono o tablet. Usted solo necesita una cuenta de email y con esa cuenta puede acceder a BEEP desde varios dispositivos. Los datos serán los mismos en todos los dispositivos. La aplicación le ofrece la posibilidad de registrarse haciendo clic en '¿Todavía no tiene cuenta? Registrar como un usuario nuevo'. Después de completar su dirección de correo electrónico y contraseña de al menos ocho caracteres, puede comenzar a usar la aplicación. Si ha olvidado su contraseña, haga clic en "¿Olvidó su contraseña?" después de lo cual recibirá un correo electrónico con un enlace para ingresar una nueva contraseña. Una vez que haya iniciado sesión, no necesita iniciar sesión la próxima vez. No se cobran costos por usar la aplicación, gracias a los amables patrocinadores (ver página de inicio).
Set language
BEEP está disponible en varios idiomas. Usted puede elegir el idioma haciendo clic justo encima del icono con una bandera  luego escogiendo su preferencia de idioma. Luego, todas las funciones de BEEP están disponibles en ese idioma. ¿Extrañas algún idioma y quieres ayudar a agregarlo a BEEP? ¡Entonces por favor, contáctenos!
Coloque la aplicación BEEP en su teléfono
BEEP es un sitio web y, al mismo tiempo, una aplicación, lo que se conoce como 'webapp'. Lo anterior significa que Usted puede utilizar BEEP en cualquier dispositivo con acceso a Internet, tales como computadoras portátiles, tablets y teléfonos móviles. Es posible colocar BEEP como aplicación en su teléfono móvil Esto se puede realizar siguiendo los pasos indicados en 'Cómo agregar sitios web a la pantalla de inicio en cualquier teléfono inteligente o tablet'. La aplicación web BEEP aún no está disponible en Android Play Store y Apple App Store. Si BEEP no se abre en la pantalla o idioma que Usted desea, entonces primero elimine el icono de la app, y segundo abra la aplicación como se describe anteriormente y asegúrese de seleccionar el idioma y la pantalla en la que Usted prefiere abrir la aplicación. Por ejemplo, la descripción general de las colmenas. Luego agregue el icono como se describe arriba. Una vez en su teléfono, el ícono de la aplicación se ve así:
![]()
Actualiza tu aplicación a la versión 2
Si Usted colocó un icono para BEEP en la pantalla de inicio de su teléfono o tablet, es posible que deba actualizarlo para acceder a BEEP versión 2. BEEP es una aplicación web y el navegador puede mantener los datos antiguos. Esto necesita ser eliminado, para que la versión 2 se cargue. Para hacerlo, puede seguir estas instrucciones:
- IPHONE e IPAD
- Configuración> Safari> Borrar historial y buscar datos
- Manual explicativo
- ANDROID
- Abra la aplicación Chrome> Avanzado> Privacidad> Borrar caché
- Explanatory manual: https://www.wikihow.tech/Clear-Your-Browser's-Cache-on-an-Android
After this step, you can simply access Beep version 2 by using the app icon on your home screen. If you want to check if you are now using version 2, you can press the menu  button. If you see the option 'New in v2!' you are using the new version.
Create a new apiary
The main menu can be opened by clicking on the button. The main menu consists of the following elements which are further elaborated below:
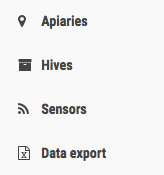
Step 1 in using the app is to create one or more apiaries; the place where your beehive(s) stand. Click on 'Apiaries'. You can now enter the basic data of your apiary such as the name, location and the number of beehives. If you fill in the full address, the other address and location data is automatically filled in at the right place, such as the GPS location coordinates and street name. The field that has to be filled in at minimum to create the apairy is the name of the apiary. Minimum required fields are marked with a *.
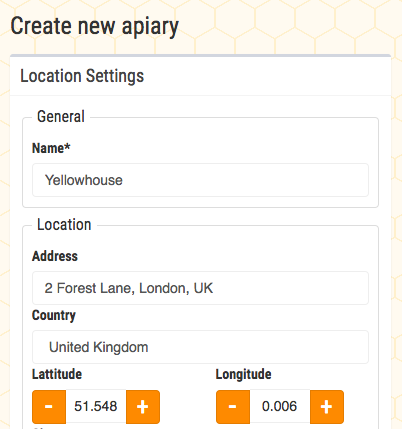
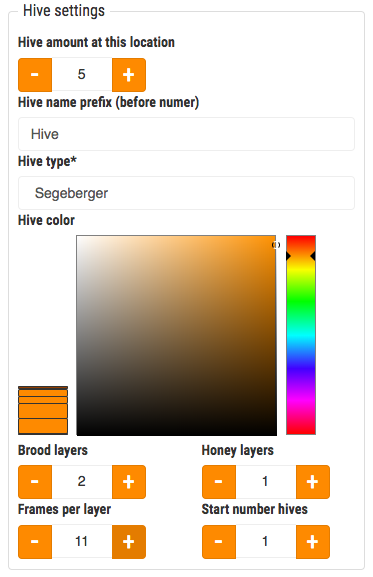
Under the section 'Location' you will find 'Hive settings'. Here you can enter how the hives are built up. On this screen you can choose a configuration. After you have saved this, you can refine or improve this per beehive.
Overview of apiaries and hives
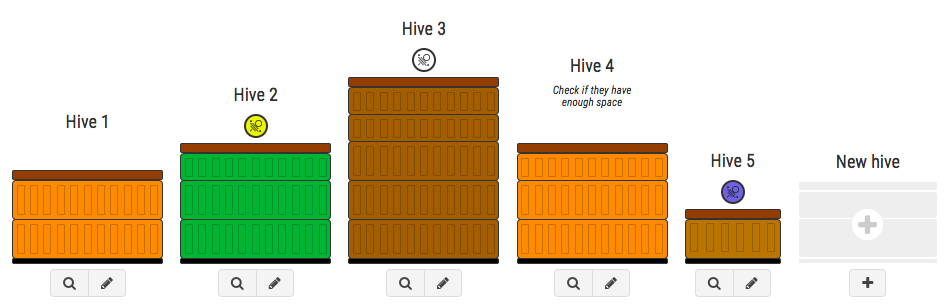
There are two overviews of your hives available via the menu Both overviews contain the beehive configuration and color, hive name, the queen mark color if she is marked and a smiley icon of the overall impression as stored in the most recent inspection. In addition, the reminder text and date of the most recent inspection is shown if filled in. There are also icons available for opening the inspection overview  and opening a new inspection checklist
  . By clicking on the picture of the beehive, you go to the screen where you can edit the details for that beehive.
Apiaries
Click on 'Apiaries' in the left menu to see the beehives sorted by bee's stand. Click on the name of the apiary to fold it in or out. The order of beehives is determined by the date of creation. The hives are automatically sorted in alphabetical order. Overview of hives on the mobile phone:

The same overview of hives on desktop or laptop looks like this:
Hives
For an overview of all beehives of all apiaries, click on 'Hives' in the menu. The hives are automatically sorted in alphabetical order. However, it is also possible to filter and sort through these buttons: ![]() The options are: by name, status total impression (smiley), exclamation mark (extra attention required is checked), calendar (reminder entered for that hive), location (sorting per apiary). If you press the button once again, the sort order is reversed.
The options are: by name, status total impression (smiley), exclamation mark (extra attention required is checked), calendar (reminder entered for that hive), location (sorting per apiary). If you press the button once again, the sort order is reversed.
Creating or modifying a beehive
New beehive
In the overview of hives, you can create a new hive by clicking on 'Create new hive'.
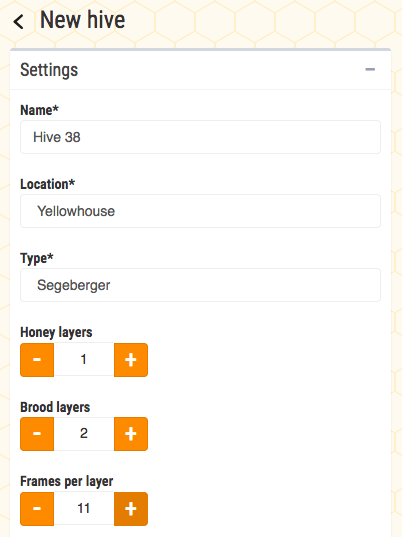
Adjust beehive details
In the overview of apiaries and hives, you can click on the image of the hive to adjust the hive data. The basic data can be adjusted for each hive and additional data can be entered. If you want to move beehives from one apiary to another, you can do that in this screen. And you can record the information on the queen, see below.
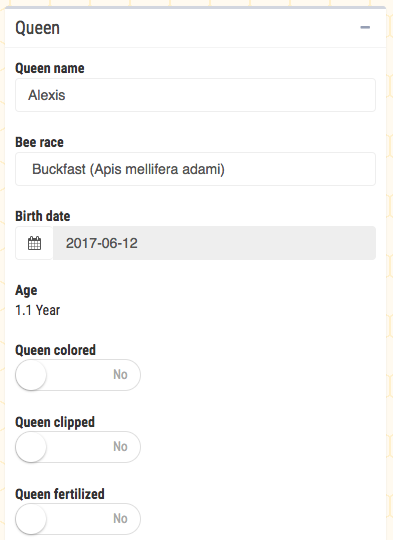
Enter queen details
The data of the queen of the colony is entered per hive by clicking in the overview of apiaries or hives on the image of the hive. The fieds to enter queen data can be found under the general section. If the queen is marked, you can select the color. The selected color is also shown in the overview of the hives. If it is not marked, then the queen icon is not shown on the overview.
Add an inspection
By clicking on the pen icon  in the overview of apiaries or beehives, you can immediately enter a new inspection. This can also be done from the inspection overview by clicking on the
 icon at the top right.
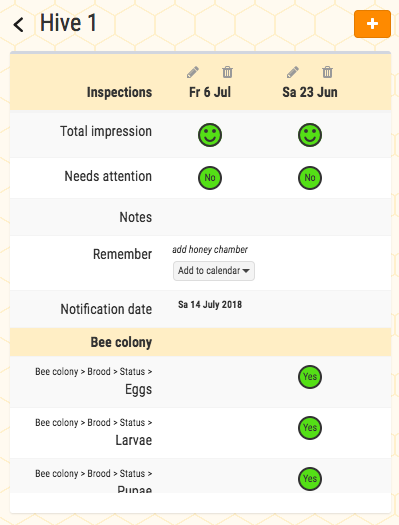
The inspection report is divided into a number of chapters: Bee colony, Food, Disorder and Production.
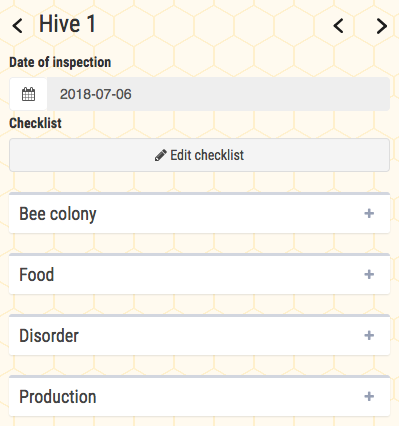
By clicking on the name of the chapter or  you can open the chapter. You will then see all the inspection items that you can fill in. There are more available. See below how you can customize your inspection checklist and layout (the order) to fit your needs. Below you can see an example of data that you can enter. There are topics that expand further if you have filled in something.
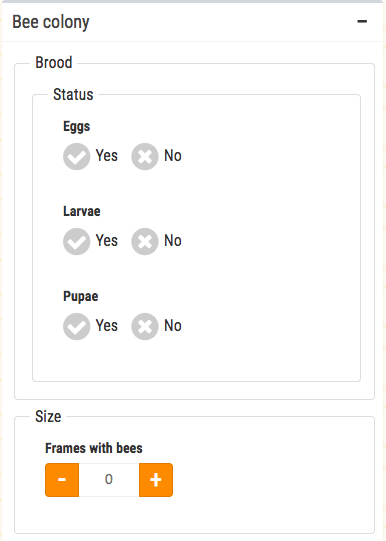
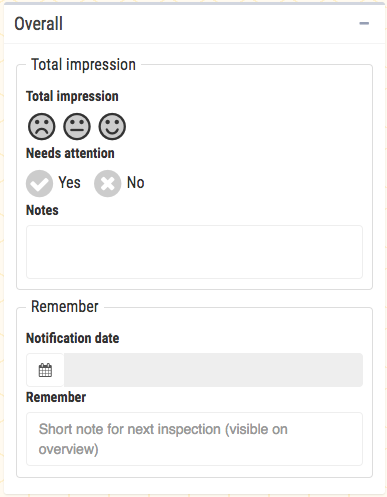
At the bottom of the inspection checklist you find a chapter called 'Overall'. Here you can fill in information about the general state of the colony as well as reminders. This information is shown on the hives overview: a smiley for the overall impression, an exclamation mark when extra attention is needed, the date of the reminder and the text of the reminder.
You do not have to fill in all the fields. You can only fill in what you have seen and done. After filling in, click on 'Save inspection'. There is no so-called autosave function. Only entered data will be shown in the inspection overview. And you can adjust the list of fields and options for inspections yourself to fit your needs:
Customize your inspection checklist
You can decide for yourself what you want and do not want to fill in the inspections. Beep offers a standard list but you can expand or shorten it further. You can choose from a list of topics for which you can enter data and notes.
How does it work?
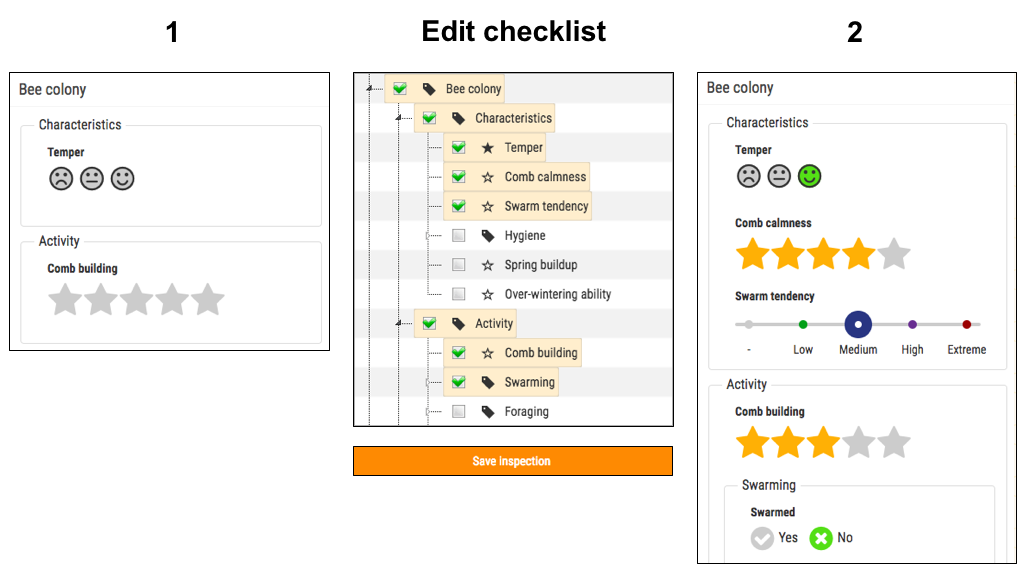
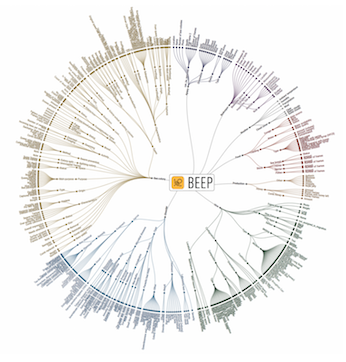
Open a new inspection for one of the hives and then click on 'Edit checklist'. An extensive list of topics is available that are structured as a tree structure. We call it the bee data 'taxonomy'. A total of 200 items are available excluding the options in option lists and about 500 items in total. There are topics about the bee colony, disorder, food, production and weather. Each subject contains multiple topics in a logical structure. See the collapsed tree structure below with four out of five main items selected.

You can expand and collapse by clicking on the arrow to the left of the topic . The topics that are already on your inspection overview are already ticked (i.e. selected). Note: if you tick a main topic, all underlying branches are also selected. Do not you want that? You can undo by not saving the changes.
Build your own inspection sheet
If you untick a topic, this topic will be removed from your digital beekeeping inspection sheet in Beep. If you have already entered data, they will be retained. And all the data that you have stored in inspections can be found in the inspection overview per hive. You can therefore tick or untick items to add or remove them from your personal inspection sheet. If you tick a subject, the topics it is linked to higher up in the tree structure are always selected. This ensures that your inspection sheet is logical and easy to use. See an example below.
Adjust order
You can also adjust the order of topics. You do this by clicking on a topic and dragging it to the desired location. Because of the logic in the tree structure you can not drag it everywhere. This is indicated by an icon where this is and is not possible. This is indicated with these icons:  and
and  . When you have found the right spot, release the mouse button (on computer) or finger/pen (on touch screen).
Search
The tree structure is quite extensive. It offers many possibilities to turn the hive card to your hand. To find something easily, you can use the search function. If you enter a term in the search field, all items that contain the search term will be colored red and be expanded. Then you can tick the subject you want to use, click on 'Save checklist'.
Overview of BEEP data categories
An extensive list of topics is available that are structured as a tree structure. See the overview below for reference purposes. We call it the bee data 'taxonomy'. A total of 200 items are available excluding the items in option lists and around 500 in total. As no standard exists for bee data, it has been compiled by the Beep team from a range of sources such as paper record keeping, COLOSS Beebook, Healthy-B toolbox, FAO honeybee diseases, Apiservices.biz glossary, Beebreed, Imkerpedia and Wikipedia. See a thumbnail of the available categories here below. Click here for the full version (pdf/Engels).
And further..
It may be useful to do the hive card configuration on a larger screen such as a desktop or laptop computer. The hive card selection applies to all hives for your account.
Inspection overview
By clicking on the magnifying glass icon  , you can see the data of the past inspections side by side, with the most recent being shown first. The most recent inspection data are on the left. You can scroll to the right to see older inspections. On some mobile phones you can best scroll on the horizontal bar with dates. The arrows at the top right can be used to open the overviews of the previous and next hive. And with the + button you can enter a new inspection.
Using reminders
At the bottom of your inspection you can enter a reminder text and date. You can use this for example to plan when you need to check queen cells. The text of this reminder will be visible on the overview of beehives. In addition, it is possible to add the reminder to your digital agenda. You do this by entering both the reminder text and the date. After saving the inspection you have an option on the overview of inspection data called 'Set in your calendar' (see image above). If you click on it, you get these digital calendar options: iCalendar, Google calendar, Outlook, Yahoo! Calendar and Microsoft Calendar. Choose the calendar you use and follow the steps to put the reminder in your calendar. If you use this button on a desktop or laptop computer, it may be that a file is being downloaded, then you can open it to put the appointment in your calendar. The reminder is put in your diary as a new appointment, after which you can adjust the exact time yourself.
Change or remove apiaries, beehives and inspections
You can change data by clicking on the icon of the pen  at bee stands and in the inspection overview. On the overview with beehives you can click on the image of a beehive. Do not forget to save the changed data. You can remove entire apiaries with or without hives, separate hives and inspections by clicking on the icon of the trash can (icon). You will then be asked for confirmation. Note that deleted and / or changed data has actually been deleted.
Move or archive beehives
Moving
If you move a hive to another apiary, you can also adjust it in Beep. The apiary where the hive (s) are moved to has to be created first. You can change this by clicking on the image of the hive. Then click on the selection list under 'Location' to link the hive to another apiary. Click on 'Save and return' and the hive is now moved to the new apiary.
Archiving
You can also use the above method to archive hives and associated inspections. Create a new apiary with for example the name 'Archive'. A new apiary must contain at least one beehive to create it, which you can removeif needed by clicking on the hive. Now use the move steps as described above to archive inactive hives and historical hive cards so that you can consult this information in the future if necessary.
Collaborate
New in version 2.1 (May 2019) is being able to share hives, the data and adding inspections for those hives. You have the following options:
- Create one or more groups
- You can give a group a name, description and color
- Invite people based on the email address that they use for their Beep login
- You can share one or more hives with the entire group
- Group members can in turn share their hives with the group
- You can choose whether inspection data can only be viewed or that others can also edit hive detais and add new inspections
- If automatic sensor data is available for a hive, this is also shared
- A group can have multiple administrators who can add and remove group members
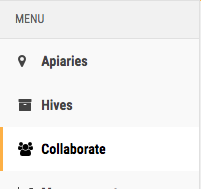
The steps are as follows. After you have clicked on the 'Collaborate' menu item, you can create a group of people with whom you want to share the data. Give the group a name and choose a color. Next, add the people you want to give access to selected hives. You can form various groups. For example the person you work together with or someone who advises you. But it can also be a larger group such as a beekeeper class. It is important that the person you invited already has an account on the Beep app with the email address you invited him or her with. If the email address is not recognized by the app, check with the person you want to add which email address they use when logging into the Beep system.
Next to yourself, you can add others in the role of 'administrator' of the group. This means that that person can also invite and remove group members. The people you invite will receive a notification in their email inbox. If they have accepted to be a member of the group, you will receive an email confirmation.

Now you can add the hives you want to share. See the screenshot above. If you click once on a hive image, you share the data with the group. This means that all members can see the hives and the inspection data. If you click twice, you also give the group permission to enter new inspections for that hive. Changing inspections can only be done by the main owner of a hive. Finally, click on 'Save' to create the group and invite the group members. Group members can add their hives to the group for sharing. To do this, click on the edit icon next to the group name.
To view data shared in the group, click Collaborate and find the hives for which you want to view the data or add inspections. If a hive is equipped with sensors, you can click on the sensor icon of that hive to view the measurement data.
Export data
Data that you have entered in the Beep web app can be exported. Click on the menu icon at the top left and then click on 'Data export' to receive a Microsoft Excel file on the email you use to log in. This file contains all data that you have entered in Beep and is organized per tab: user, apiaries, hives and Inspections.
Manage account
The user icon  gives you access to a number of options to manage your account. You can change your username and reset your password. It is also possible to delete your complete account. This means all apiaries, beehives and inspection data will be permanently removed.
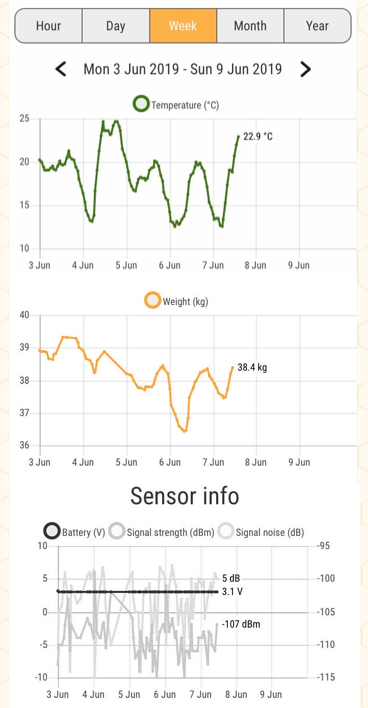
Sensors
Below you can see a screen print of a chart showing the weight of the hive in June 2018. In the morning, bees flew out (weight loss) and shortly thereafter the weight increased again (nectar, water, pollen and bees returning), then a second dip at the end of the day the weight is about the original weight. If the weather is good, but this pattern is different, then something may be wrong. In addition to weight, there are many sensors that can give a distant picture of the health and development of the colony: noise, humidity, temperature, movement, etc. See more information in this presentation . Beep Foundation is developing an open source, affordable measuring system. Keep an eye on the Beep Facebook messages and Beep email updates. If you are already use a digital hive tracking system that has an API (application programming interface) then this data can be read into the app. In that case, contact us.
Your comments
The Beep app is being developed further to make it as useful as possible for a broad beekeeper user group. Whoever realizes BEEP and why you can read here . We are happy to hear your reactions and findings. You can email them to feedback@beep.nl
Report an error
Use the feedback button in the menu to report errors in the app via email. Or click here now to send an email. Please add a screenshot of the problem. And also indicate what you thought would happen and what actually happened and the steps you went through. This helps the Beep team to find out exactly what is going on. If you try on another device (laptop, desktop, mobile), or on the same device with another internet browser, do you still experience the problem?